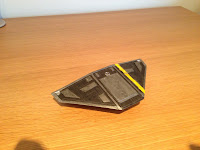
I'd initially planned to do two different details - a yellow strip down one side, and an initial/id on the other wing. I masked off the areas (took a while to cut out the letter stencils, but I was relatively pleased with the results) and then started applying the yellow.
My yellow paint is quite thin it would seem, so needed several coats before it had anything like the vibrancy I wanted (I was planning on darkening it up - but wanted it to start bright so there's be a mixture of tones).
Then the disaster happened (another one!) - after the paint had dried, I removed the masking tape. The strip was alright, there were a few bleeds, but nothing I couldn't correct, the letters however were a mess. They looked like they'd be scrawled with crayon. Worse still was that the various coats had pooled in places leaving notable ridges and ripples. Even if I could clean the edges up - it would still look a mess. What to do..
 |
| You can see the 'battle damage' on the back right panel. |
A bit more paint, and I'm actually quite pleased with how it's all looking. There's one other issue, but I'll come to that another time. Next up, start work on the stand.


No comments:
Post a Comment