Monday, 31 December 2012

The Beginning


Many years ago, I spent rather too much time playing a game called Elite. I had the Electron version at home, but played the BBC version during school lunch (and science lessons, not sure how I managed that..).


Anyway, quite recently a sequel has been announced and funded via kickstarter (Elite Dangerous Kickstarter), reminding me how much I used to love flying my spaceship around.

A few ideal googles later, and I stumbled over a rather impressive model build by a chap called Ian Lawrence. Check it out here. That looked rather cool, if quite big! I then discovered he'd later done a smaller (1/125th scale) version which you can see here.

I followed the link to the paper fold together mesh and a small bit of sticking later had a little paper model. It really wasn't the same.

Now. I've never made a model from scratch before. I've barely made any models that aren't built from lego come to that, but I decided to not let that stop me. How hard could it be.

So, after a small amount of shopping for supplies, and re-reading Ian's build diaries a few times, off I went.

Starting the build:
Back to the paper mesh. I printed that out - I didn't scale anything up, so the final model is going to be even smaller than Ian's at about 1/256th scale.

I cut the paper shapes out and stuck them to a A4 sheet of clear styrene.

Next up was cutting those out from the sheet.

Now, Ian's had far more experience than me at this (I had none...), and it may have been simply my technique or the exact type of plastic sheet I was using, but for me they were a complete nightmare to cut.

The general method seems to be score and snap (which works really well on all the slightly thinner sheets I have that I used later). On these thicker sheets, if I just attempted to snap a scored edge, they had a tendency to shatter and splinter. My technique ended up being to score, then lay a ruler against the scored edge, the bottom of the edge on the edge of the table, and then ease the plastic to be snapped off up and down until it finally snapped cleanly. This was hard work.

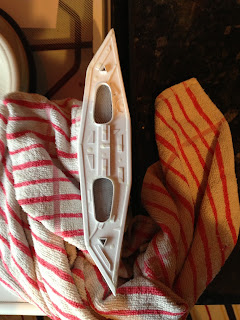
Anyway. After much stress and quite a few cracked pieces, I ended up with:


Just adding a couple of links to an awesome site with awesome monster creations!

Sunday, 30 December 2012

Bits and Pieces


More pieces needed before construction proper could commence. First up I decided to tackle the cargo hatch. I wanted to see what the thinner plastic was like, and also fancied trying to see what etching details into it worked like.

It turned out that this thinner plastic was actually really nice to score and snap - a bit softer and more flexible than the thick clear stuff, but I'd be tempted to use this exclusively for a small model next time.


Using the same plastic, I also cut out a template for the back plate so I could cut out engine holes. They were somewhat fiddly, especially the rounded corners of the larger holes. I ended up just doing a series of short, straight cuts and hoping that I could sort out any gaps later.
I also applied a light sanding to the clear piece as I wanted to give it a fogged effect, rather than have clear windows into the ship.


Saturday, 29 December 2012

Power

Next up. Electronics.
I'd not really done any since school, which was rather a long time ago - but figured I could still solder a few LED's and resistors together. After a little more googling to find out what I would need I had a very rough plan.

First up though, I needed a way to get power into the ship. So, a small hole was drilled into the base plate. This was measured to fit a cheap DC extension cable I found on the net. The attraction of this cable was that it includes the socket and connector that I would need.

I cut the cable in half, and fitted the socket into the hole which I then glued in place (it fitted very snuggly anyway, and the height of the ship means it's not going anyway - so the glue was more of a precaution).

I then stripped the cable end and isolated the two parts (there's an inner core which is either the + or -, and then a bunch of surrounding wires which is the other.

Finally, I assembled the first parts of the ship. I'd need a basic hull to fit the LED's into place.
You can see in the picture I've covered the back plate in black tape in an effort to stop light leak (I couldn't find the silver tape Ian recommended). I've also fitted some wire mesh over the light holes for extra detail.


Sticking with the theme of Power. I dusted off my old soldering iron, and started sticking leds and resistors together. I've discovered I'm not very good at this, and also I could do with more flexible wiring, mine was quite stiff and often quite hard to arrange as I wanted (including when I finally fitted it to the ship).

I attempted to build the 555 fader circuit Ian used in his, but after several failed attempts bailed on that idea. It would have been nice - but in hindsight, I'm not sure I could actually have fitted the extra circuit board into my small ship - maybe with more planning. We'll see next time... On the plus side, I now have a nice little hobby breadboard for prototyping any future attempts.


After everything was in one piece, and I'd squeezed it all into the hull, I roughly taped the rest of the pieces into place to see how it would look.


Friday, 28 December 2012

Problems

After a small amount of shuffling around, I had the LED's where I wanted them (not so close to the engines that they appeared as bright points, but not so far that you couldn't see them).

However, the taped together pieces did reveal another problem. Some of the bits didn't fit. I'm not sure why, it may have been the cutting of the paper template, inaccuracies from snapping the clear sheet, or something else. Not sure. Either way - there were some quite nasty gaps.

I considered trying to fill them with thin strips, but rejected this as a bit of a bodge, and very likely to cause more problems then it would solve. So, biting the bullet - I scrapped several pieces, and re-did them. This time I used the thinner plastic, so cutting was a much quicker and simpler process.

I never mentioned before, but as you can see in the image I've also been following another of Ian's suggestions and etching details into the various panels. I've been using a small tool I use for clay sculpting for this, seems to work well enough so far.


Finally, all the bit fit! - Or at least fit well enough for my first amateurish attempts at this.

Thursday, 27 December 2012

Rear end, detailing and sanding.

Here you can see the ship drying after I'd finished applying some details to the rear end.


The engine casings are made from thin strips of styrene plastic (I think you can see the packet in the previous post).

It's cut and fixed into place for the small engines, and bent and fixed for the larger ones to give the curved corners.

The recesses outside the corners I filled with glue.

I then made use of off-cuts from making the panels, and a few more bits of the thin strip to add details to the back plate.

I added a few similar details to some of the other panels, just to give the surface some more interest.

Any little gaps I've been filling with shards of plastic and glue, or - if very small, just glue. It seems the glue is pretty much a mixture of a thinner and something similar to the plastic I'm using (not so hot at chemistry...) - so when it sets, it makes a fairly decent surface which can be sanded back to smooth.

Talking of sanding, that was up next. Sanding and filling and adding details and sanding and filling and... That took quite some time.

Tuesday, 25 December 2012

More of the same...

Here you can see more work gone into adding surface details.

I made use of more of the thin styrene strips to cover the joins in the pieces - another tip from Ian's pages. Lots of glue and sanding was then applied to smooth them off and make it all feel like a single piece.

On the back plate and in one or two other spots I carefully applied drops of glue. Now it's dried the form smooth rounded shapes I couldn't have achieved easily otherwise.

In the background of one of the images, you can see the start of the front laser. I'm going with a much simpler hull design than Ian's - no extra thrusters, dishes, external missiles or similar.


Monday, 24 December 2012

First coat

Time to start finishing things off a little bit.


It's been quite a while since I last did any painting - and that was of a clay sculpture. I wasn't sure quite how the paint would look or if the masking tape I used would give a decent block and clean edge (it does and did by the way - it's from Tamiya, so I hoped it would do a decent job).

I started by painting samples onto some offcuts to get a feel for it. Then proceeded to start with a quick spray of 'Skull White'. This showed up a few cracks and holes which I filled with copious amounts of glue.


Sunday, 23 December 2012

Oops. (Painting)


Finally it was time to paint!
First up, a dark metallic silver over the base coat.
Once that had dried, I spent quite a while applying masking tape to the struts and panels.
I then blended some black into the paint and applied a coat to the exposed areas.

It dried Ok, my brushwork needs practice (I don't have an airbrush, or the skills to use one - and couldn't really justify the cost for this little project...). The surface does have quite a nice metallic sheen to it, visually much more interesting that a plain glossy plastic surface. However. There was a problem...


If you recalled from earlier - I'd etched detailing into each of the panels, while this was still just visible on the bottom of the ship, virtually none could be seen on the top - all the planels looked flat and really not that great. Somewhat disappointing.

At this point, I considered 2 options (3 if you include scrapping it all!). First, to cut out some new panel shapes out of some very thin styrene sheets which I could quite easily cut to fit. I could re-etch these and apply them over the existing panels.  That would requirer much more gluing, sanding and painting. The second choice was to attempt to re-etch the panels in place. While that sounded tricky - I figured if I made a mistake, I could still go with the replacement panel option.

I taped the ship down to keep it stable. Then slowly re-etched the surface. Getting better...


The newly eteched lines looked rather white. I also wasn't completely happy with the way the dark and light silvers sat together. I had no real plan for how it should look - initially I was tempted to have it look a lot more like Ian's but I decided to go with a somewhat darker look. Time to dirty things up a bit. Using some black mixed with the dark metallic silver I made a wash and went over the more of the surfaces.


Not the greatest photos ever taken - and still work in progress here - but you can see how the wash has bought everything down a couple of shades, and the lighter silver plates now look like they're covered in some kind of oily residue. Just right for an old ship that's spent it's life hanging around in backwater space stations.

Thursday, 20 December 2012

More paint and problems

I liked how things were progressing, but felt it was looking a bit dull. Maybe lacking a little in character. So, I decided to add a splash of yellow.

I'd initially planned to do two different details - a yellow strip down one side, and an initial/id on the other wing. I masked off the areas (took a while to cut out the letter stencils, but I was relatively pleased with the results) and then started applying the yellow.

My yellow paint is quite thin it would seem, so needed several coats before it had anything like the vibrancy I wanted (I was planning on darkening it up - but wanted it to start bright so there's be a mixture of tones).

Then the disaster happened (another one!) - after the paint had dried, I removed the masking tape. The strip was alright, there were a few bleeds, but nothing I couldn't correct, the letters however were a mess. They looked like they'd be scrawled with crayon. Worse still was that the various coats had pooled in places leaving notable ridges and ripples. Even if I could clean the edges up - it would still look a mess. What to do..

I took a fairly drastic decision and got my craft knife out and pretty much cut the paint back. Scrapping it down to the plastic where I could. It still wasn't as smooth as it had been however. I had a couple of options, apply a new layer of plastic over the top (I've some nice thin sheets - this would have worked Ok I think) - or make the most of it, so I decided to go for a battle damaged look. Working with the existing scratches, I made some more with the aim of it looking like some old weapons damage.
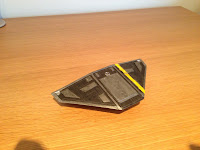
You can see the 'battle damage' on the back right panel.

A bit more paint, and I'm actually quite pleased with how it's all looking. There's one other issue, but I'll come to that another time. Next up, start work on the stand.


Saturday, 1 December 2012

Finishing off


Time for something to sit it on. Simple stand made from offcuts of the plasic used with the ship, along with a small length of plastic tube. Inside the tube is fitted the other end of the DC cable - this both supplies power to the ship, and also provides a snug socket to mount it on. The battery case is secured underneath. The whole lot is then painted metallic silver.


And there we go. Next up print out a little museum card style information panel, and attach it to the stand. You can also see at this point, I also attached the front pulse laser. Nothing too clever here, just a variety of thin strips glued together to give an interesting shape.


And here it is, sat on my bookshelf.


And some more shots. It might not be quite as polished as Ian's example - and a fair bit went wrong along the way (which I guess means I learnt quite a bit too). But considering this was the first time I'd built anything like this, I'm pretty pleased with the results.